Note: This article has some interesting WSL-centric material, like how to:
- Set up bridge networking without Hyper-V
- Find the UWP Ubuntu executable to run Linux commands outside of a WSL terminal
- Create automatic startup tasks without systemd init system
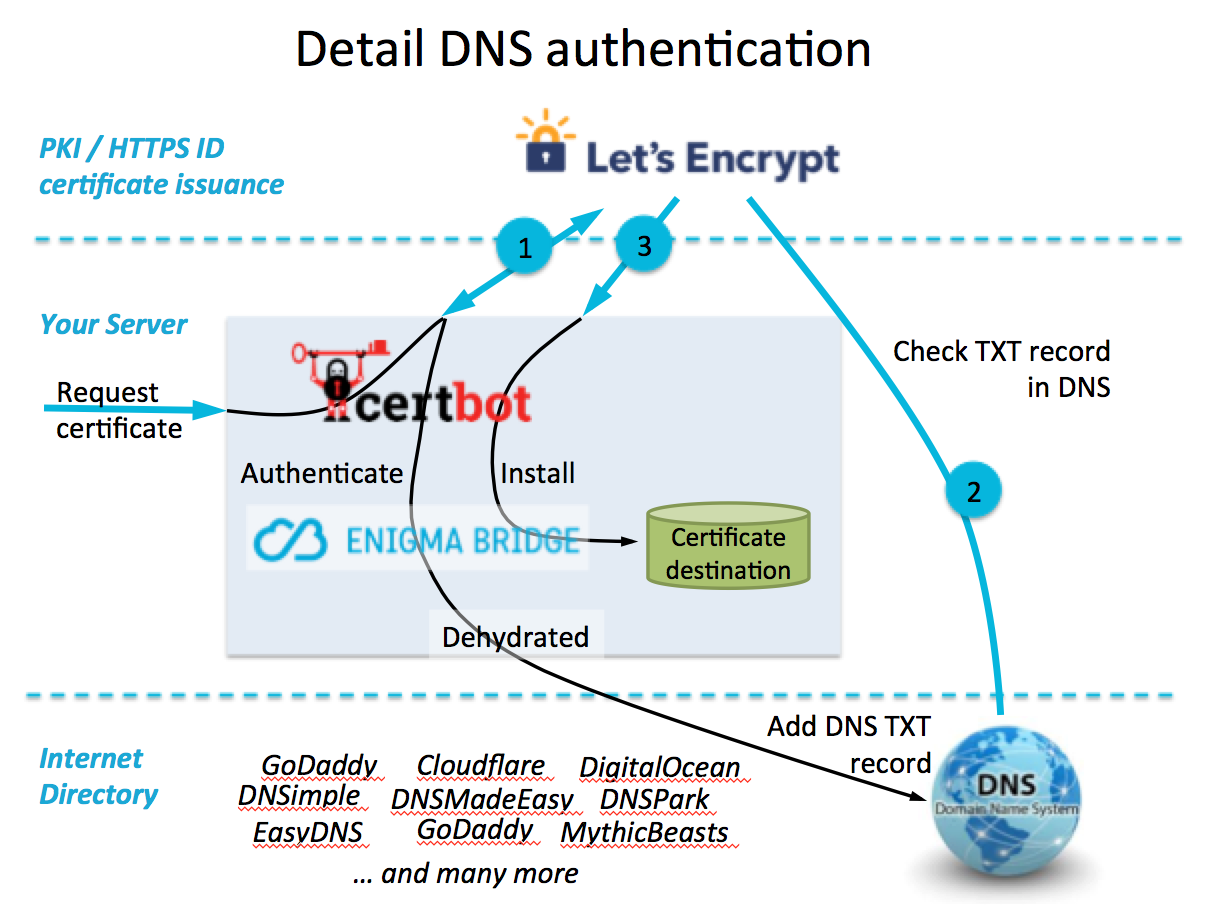
- Expose your (domain-enabled) dev environment to certbot/letsencrypt for automatic issuance of SSL certificates
- Use nginx proxy for react
So even if you’re not doing the exact thing I set out to do (create an HTTPS dev & build preview server), you might still find these notes useful.
Update 6/11/2021: While the notes in this article basically work, WSL is pretty quirky for doing backend development. There are many strange variables that have no parallel in a stock Ubuntu installation.
Also, bridge.sys kept KP-ing my laptop, but I did manage to stop BSODs by replacing the Dell-released driver with the newest stock Intel driver. But I have to say, there’s nothing more frustrating/demoralizing than having the system crash while trying to write code. Hopefully you won’t have the same issue, I will leave this up in case it helps anyone with any of these steps, but I cannot in good conscience recommend it as a development platform. It’s OK, just know the risks!
If you are looking for a platform to develop software you plan to deploy to an Ubuntu VPS, I recommend using a virtual machine. I have taken to doing front-end dev in WSL and copying anything that needs additional tooling/config to a “real” Ubuntu VM *first*, getting it ready on that, and *then* pushing it to VPS.
Interestingly, if you run Alpine on your web server, WSL might actually be more suitable for backend tooling configuration, as Alpine uses OpenRC rather than systemd as its init system – it’s probably more likely that you could use it in the WSL environment similarly to how you’d run it bare metal. I have not verified this first-hand, this guess is purely informed speculation from using Alpine extensively for various servers and containers – but never for WSL. Try it, find out, and message me!
Examples of major weird / unparalleled issues I ran into re: using WSL for backend tooling are (from orig post):
- Windows controls all the networking. That makes setting stuff up that requires networking really strange. In addition, the bridge setup I enabled has needed to be re-adopted manually after every Windows reboot, the WSL vNIC won’t stay configured to stay in the bridge persistently.
- There’s no actual init system. That means no systemd for enabling / starting / stopping software.
/etc/init.d/$INITSCRIPTis present, but has no upstart control, so => - All “init” jobs are handled by Windows Task scheduler – either that, or you just don’t start scripts automatically (unless there’s another method I’m not aware of)
MS’s software L2 bridge (shown asNetwork Bridgeadapter inNetwork Connection) which usesbridge.syshas a high propensity to cause kernel panics (and thus, BSODs) on my system. I’m using a Dell Precision 7730 w/ Intel i219-LM network adapter w/ driver version12.18.9.10on19043.1110. If you’ve got something different, good luck to you. If your setup is quite similar, brace yourself for BSODs.
After updating my I219-LM ethernet adapter driver to the one available on the Intel website (instead of the one released by Dell), I have managed to run this configuration for the last day and a half and haven’t had any KPs frombridge.sys. That’s a new record!
The new driver is version 12.19.1.37, listed as v26.3 on Intel’s website. Note: The ProSet (software) and driver are in separate packages, ProSet archive does not install driver. Hoping it holds, but feeling pretty confident about it working so far. Would be nice if these computer vendors would support their hardware longer than a couple years.
I still like WSL2 for the additional flexibility it gives me in Windows, but it’s been “liberating” to recognize its deficiencies and put aside trying to get it to do everything I want – it’s just not there yet. The sooner I realized that, the sooner I stopped trying to wrap its alien configuration methods to purposes for which they are ill suited, and got back to coding.
However, if you want to try to get it to do stuff it’s not “supposed” to do, I left these notes up in the hope that someone else would come along and build on what I learned after several days of frustrating experiences.
Orig post:
This is a heavy post. This is the kind of thing I do when I’m working through a tough problem – well organized notes are a must. Obviously, parts of this will make more sense to me than you, but I have the added benefit (shortcoming?) of having trouble making sense of my notes when I come back to them, so I try to make them as complete as possible the first time so hopefully if it feels like I’m “reading them again for the first time” they still make sense.
This was an environment I set up over a night setting up certbot with nginx for testing a create-react-app project, which sounds trivial, but there are some definite caveats and pitfalls:
- I’m using it for a dev environment, which is the opposite of what
certbotis intended for (but it does make some things easier, if you can get it to work in the first place…). You have to set it up with a sort of “this could be for production” mindset, as it requires a lot more bootstrapping than your average dev env. - I’m using
WSL2, which is just weird to configure coming from a bare-metal distro, and not well documented for what I’m attempting (I don’t think there are any other attempts documented on the net thus far – including disparate forum threads, github issues, reddit, etc.). I know Microsoft really tries, and there’s nothing else quite like WSL2, so they deserve some kudos for even creating this Linux compatibility layer, but… well… if you try it, you’ll see what I mean… - The networking doesn’t ever really work right without manual intervention after each boot. It’s not that big of a deal, but it further belies how WSL is really lacking in proper integration with Windows. It works, but it’s hacky – it’s not ready for prime-time.
Certbot, nginx and CRA on Ubuntu 20.04 LTS WSL2 dev environment
There’s a really comprehensive guide about deploying CRA with nginx and certbot for HTTPS over here: https://coderrocketfuel.com/article/deploy-a-create-react-app-website-to-digitalocean
Can check against this article, but it does not cover WSL – so if you’re working w/ WSL it’s only good for some things.
some baseline info — env:
ISP: comcast residential cable (dynamic IP with namecheap dynamic DNS)
Home domain name: home.com
Current home gateway IP: 67.100.93.10 (fake)
LAN subnet: 192.168.1.0/24 (real)
WSL target IP: 192.168.1.244 (why not)
Windows: 21h1 (bloody)
Also have a 256GB NVMe with Ubuntu 21.04 on it I can run through VMWare Workstation, but surprisingly WSL2 is more performant (although the VMware VM has a GUI, so apples and oranges…). I like the WSL integration, but this hairy config stuff is a little tiresome. Oh well, I’m in this far now…
WuSLbuntu:
└─ ▶ cat /etc/os-release && uname -a
NAME="Ubuntu"
VERSION="20.04.2 LTS (Focal Fossa)"
ID=ubuntu
ID_LIKE=debian
PRETTY_NAME="Ubuntu 20.04.2 LTS"
VERSION_ID="20.04"
HOME_URL="https://www.ubuntu.com/"
SUPPORT_URL="https://help.ubuntu.com/"
BUG_REPORT_URL="https://bugs.launchpad.net/ubuntu/"
PRIVACY_POLICY_URL="https://www.ubuntu.com/legal/terms-and-policies/privacy-policy"
VERSION_CODENAME=focal
UBUNTU_CODENAME=focal
Linux wharfrat 5.4.72-microsoft-standard-WSL2 #1 SMP Wed Oct 28 23:40:43 UTC 2020 x86_64 x86_64 x86_64 GNU/Linux
make sure focal-updates/universe repo enabled in /etc/apt/sources.list:
└─ ▶ grep -v "#" /etc/apt/sources.list
deb http://archive.ubuntu.com/ubuntu/ focal main restricted

deb http://archive.ubuntu.com/ubuntu/ focal-updates main restricted

deb http://archive.ubuntu.com/ubuntu/ focal universe
deb http://archive.ubuntu.com/ubuntu/ focal-updates universe # <-- this is our repo here

deb http://archive.ubuntu.com/ubuntu/ focal multiverse
deb http://archive.ubuntu.com/ubuntu/ focal-updates multiverse

deb http://archive.ubuntu.com/ubuntu/ focal-backports main restricted universe multiverse

deb http://security.ubuntu.com/ubuntu/ focal-security main restricted
deb http://security.ubuntu.com/ubuntu/ focal-security universe
deb http://security.ubuntu.com/ubuntu/ focal-security multiverse
Universe repo certbot package maintainer’s info:
└─ ▶ apt show certbot
Package: certbot
Version: 0.40.0-1ubuntu0.1
Priority: extra
Section: universe/web
Source: python-certbot
Origin: Ubuntu
Maintainer: Ubuntu Developers [email protected]
Original-Maintainer: Debian Let's Encrypt
Bugs: https://bugs.launchpad.net/ubuntu/+filebug
Installed-Size: 51.2 kB
Provides: letsencrypt
Depends: python3-certbot (= 0.40.0-1ubuntu0.1), python3:any
Suggests: python3-certbot-apache, python3-certbot-nginx, python-certbot-doc
Breaks: letsencrypt (<= 0.6.0)
Replaces: letsencrypt
Homepage: https://certbot.eff.org/
Download-Size: 17.9 kB
APT-Sources: http://archive.ubuntu.com/ubuntu focal-updates/universe amd64 Packages

Description: automatically configure HTTPS using Let's Encrypt
The objective of Certbot, Let's Encrypt, and the ACME (Automated
Certificate Management Environment) protocol is to make it possible
to set up an HTTPS server and have it automatically obtain a
browser-trusted certificate, without any human intervention. This is
accomplished by running a certificate management agent on the web
server.

This agent is used to:
Automatically prove to the Let's Encrypt CA that you control the website

Obtain a browser-trusted certificate and set it up on your web server
Keep track of when your certificate is going to expire, and renew it

Help you revoke the certificate if that ever becomes necessary.

This package contains the main application, including the standalone
and the manual authenticators.
first, you’ll want to set up WSL2 so it can work in bridge mode. Create a bridge in Control Panel\Network and Internet\Network Connections by ctrl-clicking vEthernet (WSL) and Ethernet (or WIFI), right-clicking and selecting ‘create bridge‘
I took screenshots! Look at me go…:
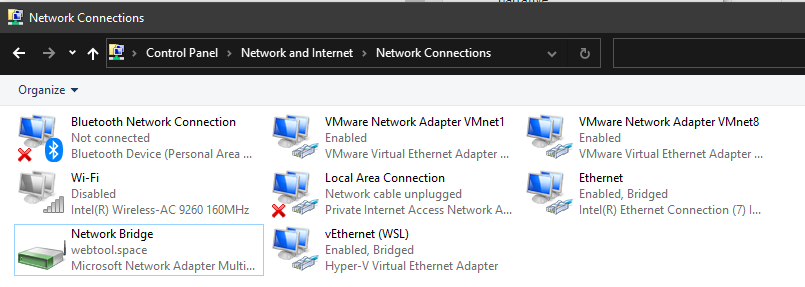
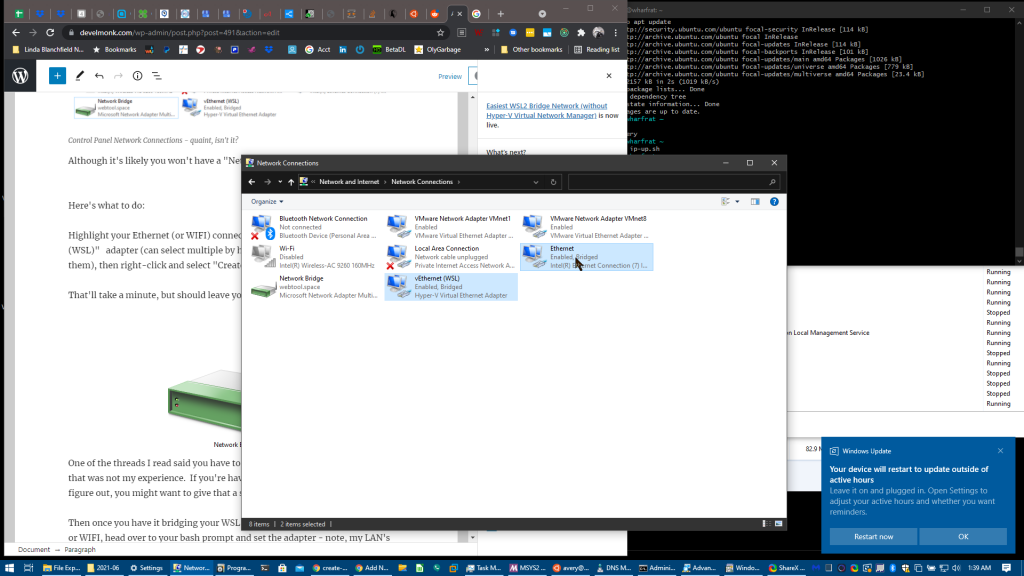
AFAIK you have to re-add WSL NIC in control panel every time you reboot (through the right-click -> properties menu) – trying to work around this, but haven’t found a solution yet as of 8am 6-5-2021
Then go to services.msc and disable Internet Connection Sharing (ics) – find it, right click, go to properties and select ‘disabled‘.
AFAIK this admin template is for domain networks only, so if in a domain env, try doing this:
Go to group policy editor and search for ‘ics‘ keyword, there will be only one administrative template. Enable it – it’ll disable internet connection sharing on your domain
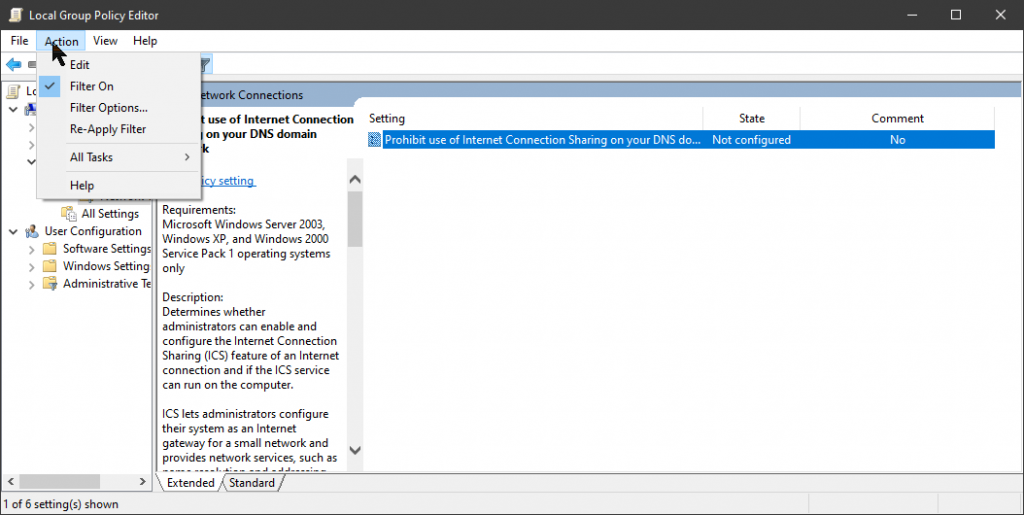
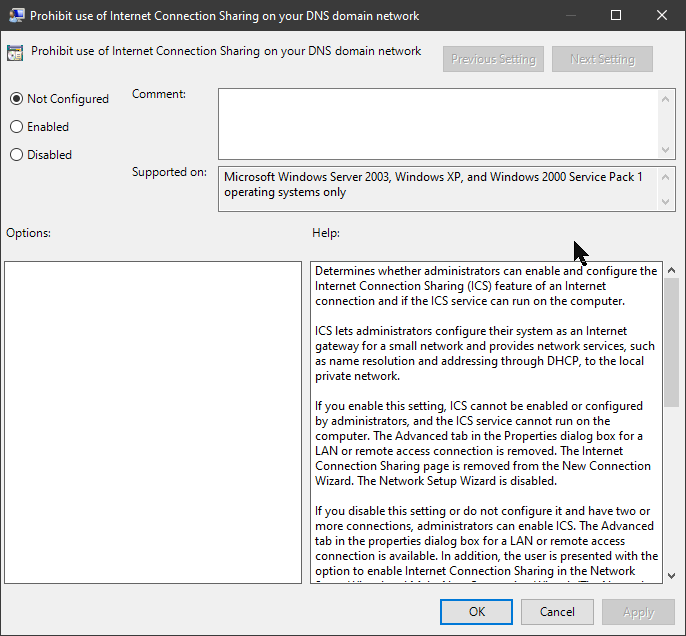
TBH neither one of these methods really stopped ICS from being started with Ubuntu, but with the help of the ip commands (make a script!) it’s relatively painless to get back to a workable bridge network connection after reboot – just re-add WSL NIC in control panel to the network bridge, and re-run these ip commands (coming up…). I had varying success getting the ICS service to stop in services.msc – it doesn’t really seem to matter.
Next, open Ubuntu and run these commands – choose whatever IP and gateway you’d like/need:
sudo ip addr flush dev eth0
sudo ip addr add 192.168.1.244/24 dev eth0
ip addr show dev eth0
sudo ip link set eth0 up
sudo ip route add default via 192.168.1.1 dev eth0
ip route show
ping 192.168.1.1
ping google.com
install ifupdown – and if you want, optional ifupdown-extra scripts:
sudo apt update && sudo apt install -y ifupdown [ifupdown-extra]
and add something like this to /etc/network/interfaces:
auto lo
iface lo inet loopback

auto eth0
iface eth0 inet static
address 192.168.1.244/24
gateway 192.168.1.1
Add these two lines using visudo so you can start nginx without a password:
# Allow members of group sudo to execute any command

%sudo   ALL=(ALL:ALL) ALL
%sudo ALL=NOPASSWD: /etc/init.d/nginx start
%sudo ALL=NOPASSWD: /etc/init.d/networking start
Get the path of Ubuntu.exe so you can create a task in task scheduler using Ubuntu UWP install – note, you can find the exact path in Task Manager while Ubuntu window is open by finding wsl.exe or Ubuntu.exe, right-clicking and going to details, the right-clicking on Ubuntu.exe and showing file location. It’ll be something like this:
"C:\Program Files\WindowsApps\CanonicalGroupLimited.UbuntuonWindows_2004.2021.222.0_x64__79rhkp1fndgsc\ubuntu.exe"
Then you can use it to run the service from Windows and set it up in Task Scheduler to start on login, boot, etc.:
"C:\Program Files\WindowsApps\CanonicalGroupLimited.UbuntuonWindows_2004.2021.222.0_x64__79rhkp1fndgsc\ubuntu.exe" run sudo /etc/init.d/nginx start
try restarting to see if it works … (open an ubuntu window and see if you have networking – your /etc/network/interfaces IP, etc. – save those ip commands in a script, just in case!…)
install nginx and certbot w/ certbot nginx plugin and docs:
sudo apt update && sudo apt install -y nginx certbot python3-certbot-nginx python-certbot-nginx-doc
Get loopback and ethernet card info – omit loopback (no need to do for loop) if only assessing outward-facing network, or plan to use certbot instead of openssl self-signed cert:
└─ ▶ for i in eth0 lo; do ip addr show dev $i; done

# output:

4: eth0: mtu 1500 qdisc mq state UP group default qlen 1000
    link/ether 00:15:5d:ab:6b:b6 brd ff:ff:ff:ff:ff:ff
    inet 172.24.219.149/20 brd 172.24.223.255 scope global eth0
       valid_lft forever preferred_lft forever
    inet6 fe80::215:5dff:feab:6bb6/64 scope link
       valid_lft forever preferred_lft forever
1: lo: mtu 65536 qdisc noqueue state UNKNOWN group default qlen 1000
    link/loopback 00:00:00:00:00:00 brd 00:00:00:00:00:00
    inet 127.0.0.1/8 scope host lo
       valid_lft forever preferred_lft forever
    inet6 ::1/128 scope host
       valid_lft forever preferred_lft forever
WSL: this address is only available on your local machine (because it’s a NAT address). You want an address on your LAN.
Start ngnix – native ubuntu:
└─ ▶ sudo systemctl enable --now ngnix
Start ngnix – WSL – the old upstart way, but without upstart (see Windows Task Manager workaround – yes, you read that right):
└─ ▶ sudo /etc/init.d/nginx start

# output:
Starting nginx nginx [ OK ]
check ip address (either lo or eth0):
Browser: http://localhost
Received:
Welcome to nginx!
If you see this page, the nginx web server is successfully installed and working. Further configuration is required.
. . .
set /etc/ngnix/sites-available/default settings:
sudo vim /etc/nginx/sites-available/default
set firewall for 80 and 443
( beyond scope – see firewall-cmd, ufw, iptables, ntables, bpf, etc. documentation )
copy virtual site portion of nginx default config
cd /etc/nginx/sites-available && cat default

# (selected and copied virtual section to file called subdomain.domain.name)

vim lindabnotary.home.com # name of dev site - I pasted default virt config here

sed -i 's/#//g' lindabnotary.home.com # get rid of all the comment leaders

vim lindabnotary.com # added a couple hashes for top comment, edited site name, added https port - example:


# File: /etc/nginx/sites-available/lindbnotary.home.com

cat /etc/nginx/sites-available/lindabnotary.home.com

# You can move that to a different file under sites-available/ and symlink that to sites-enabled/ to enable it.

server {
listen 80;
listen [::]:80 ipv6only=yes;

server_name lindabnotary.home.com;

   root /var/www/lindabnotary; ### end new bits
   index index.html;

   location / {
           try_files $uri $uri/ =404;
   }
}
The nice thing about certbot, is you can create a super easy cursory config file like this and when you invoke the script it’ll take care of the rest of the config for you in an optimized fashion. All it has to be able to do is connect with your endpoint via http – with the correct domain name in nginx. Which brings me to the next subject…
I have Windows AD DNS, so I created a DNS entry for my local dev server:
DNS server RSAT –> create A + PTR records: lindabnotary.home.com @ 192.168.1.244, 244.1.168.192.in-addr.arpa
If you don’t have a DNS server, set up dnsmasq or similar (out of scope) – one easy way off the top of my head is to create a record in pfsense/opnsense to the eth0 ip addr
The pfsense alias thing will work for local dev, but you won’t be able to create a certbot instance through its automated cert creator unless you have an externally-accessible domain name (ala one purchased through a registrar, like namecheap, godaddy, etc.). So if this is your case, either quit while you’re ahead and experiment on your VPS, get a DN through namecheap and link it up to your home’s external IP real quick, or read up on how to generate a cert using certbot manually (or using openssl to create a self-signed cert).
certbot manual instructions (note: I have no idea if this actually works the way I’m hoping it would): https://certbot.eff.org/docs/using.html#manual
I’m noticing there’s also dns-standalone plugin which is presumably for bind, etc. but probs still needs an external DN.
create symlink to dev build:
└─ ▶ cd /var/www && ln -s /home/avery/node/lindabnotary/build ./lindabnotary

└─ ▶ ls -la
total 12
drwxr-xr-x 3 root root 4096 Jun 4 22:16 .
drwxr-xr-x 14 root root 4096 Jun 4 20:26 ..
drwxr-xr-x 2 root root 4096 Jun 4 20:26 html
lrwxrwxrwx 1 root root 35 Jun 4 22:16 lindabnotary -> /home/avery/node/lindabnotary/build
create symlink between sites-available and sites-enabled:
└─ ▶ sudo ln -s /etc/nginx/sites-available/lindabnotary.home.com/etc/nginx/sites-enabled/lindabnotary.home.com
(re)start nginx:
└─ ▶ sudo /etc/init.d/nginx start

# output:
Starting nginx nginx
navigated to dev site lindabnotary.home.com in browser
Returned: “It works!” 😂😂😂
Then once the nginx server is serving the content locally, it’s time to set it up for access on the internet.
Necessity for web access – certbot requires internet access to your site in order to work. You must be able to get the dev server to respond to an http request on the internet. Therefore, you must open a firewall port to your dev server (at least temporarily) through external firewall/gateway, etc.
I did this in OPNsense. Here’s a thread/guide if you have questions: https://forum.opnsense.org/index.php?topic=6155.0
(Through web GUI):
Location: Firewall –> NAT –> Port Forward
- Firewall: NAT: Port Forward
- Interface: WAN
- TcpVersion: IPV4
- Protocol: TCP
- Destination: WAN address
- Destination port range: HTTP, HTTPS
- Redirect Target IP 192.168.1.244
- Pool options: default
- Description: WSL on Dell Laptop WharfRat (for dev purposes)
- Set local tag: (optional)
- Match local tag: (if you have one)
- Nat reflection: Enable
- Filter rule exception: (Will autocreate when saved)
Then, now that the external firewall rule is enabled to allow access from the internet, get your gateway’s current external ip address:
└─ ▶ curl -s https://dnsleaktest.com | grep Hello | cut -d '>' -f2 | cut -d '<' -f1
Returned:Hello 67.100.93.10
And use the IP address to see if you can access your site from outside – There’s lots of ways you could do this, but I used my cell phone’s browser after turning off WIFI.
Real quick: If you mess your domain’s config up, you can do this to start over:
└─ ▶ sudo certbot delete --cert-name lindabnotary.home.com
OK, now for the moment of truth – run this command for certbot to automatically create a certificate and configuration:
└─ ▶ sudo certbot run --nginx -d lindabnotary.home.com
Another quick note: My namecheap dynamic DNS only allows one subdomain at a time, so I did not configure the www.lindabnotary.home.com DN. The subdomain ‘lindabnotary’ is already a wildcard – it’ll link to whatever server is presented through the firewall, not a specific server identified by the subdomain, like a “real” static DN.
But if you wanted to (or it would matter in your case, unlike mine) you could just string another ‘-d www.example.com‘ on the end (presumably, you can do as many -d‘s as you want).
Here’s the output – I selected 2 for redirecting all traffic to HTTPS:
Saving debug log to /var/log/letsencrypt/letsencrypt.log
Plugins selected: Authenticator nginx, Installer nginx
Obtaining a new certificate
Deploying Certificate to VirtualHost /etc/nginx/sites-enabled/lindabnotary.home.com

Please choose whether or not to redirect HTTP traffic to HTTPS, removing HTTP access.

1: No redirect - Make no further changes to the webserver configuration.
2: Redirect - Make all requests redirect to secure HTTPS access. Choose this for
new sites, or if you're confident your site works on HTTPS. You can undo this
change by editing your web server's configuration.

Select the appropriate number [1-2] then [enter] (press 'c' to cancel): 2
Redirecting all traffic on port 80 to ssl in /etc/nginx/sites-enabled/lindabnotary.home.com

Congratulations! You have successfully enabled
https://lindabnotary.home.com

You should test your configuration at:
https://www.ssllabs.com/ssltest/analyze.html?d=lindabnotary.home.com

IMPORTANT NOTES:

Congratulations! Your certificate and chain have been saved at:
/etc/letsencrypt/live/lindabnotary.home.com/fullchain.pem
Your key file has been saved at:
/etc/letsencrypt/live/lindabnotary.home.com/privkey.pem
Your cert will expire on 2021-09-03. To obtain a new or tweaked
version of this certificate in the future, simply run certbot again
with the "certonly" option. To non-interactively renew all of
your certificates, run "certbot renew"
If you like Certbot, please consider supporting our work by: Donating to ISRG / Let's Encrypt: https://letsencrypt.org/donate
Donating to EFF: https://eff.org/donate-le
Note: Now nginx config has been altered by certbot – here’s what it looks like after running the installation command:
You can move that to a different file under sites-available/ and symlink that to sites-enabled/ to enable it. Don’t forget to restart nginx.
   server {
       server_name lindabnotary.home.com;

       root /var/www/lindabnotary;
       index index.html;

       location / {
           try_files $uri $uri/ =404;
   }

   listen [::]:443 ssl ipv6only=on; # managed by Certbot
   listen 443 ssl; # managed by Certbot
   ssl_certificate /etc/letsencrypt/live/lindabnotary.home.com/fullchain.pem; # managed by Certbot
   ssl_certificate_key /etc/letsencrypt/live/lindabnotary.home.com/privkey.pem; # managed by Certbot
   include /etc/letsencrypt/options-ssl-nginx.conf; # managed by Certbot
   ssl_dhparam /etc/letsencrypt/ssl-dhparams.pem; # managed by Certbot
   }


server {
    if ($host = lindabnotary.webtool.space) {
        return 301 https://$host$request_uri;
    } # managed by Certbot

   listen 80;
   listen [::]:80 ipv6only=on;

   server_name lindabnotary.home.com;
return 404; # managed by Certbot
Troubleshooting: I noticed after I got the lock icon locally, I still couldn’t access my site remotely. For dev purposes, this might not be a big deal – I really just need to do development work locally, I’ll worry about external HTTPS access once I get it on the VPS.
Not having port 80 access and not being able to access 443 from the internet WILL prevent certbot from updating the certificate automatically, but I could just open up port 80 access again (instead of auto-redirect) in the /etc/nginx/sites-available/lindabnotary.home.com file for automatic updates to work.
Hopefully this is just a small issue like a firewall port not being open, or something – will need to go re-check my OPNsense config…
Further dev stipulations: Now that I have my .pem file from certbot, I can link to it while running the development server, by editing the project folder’s package.json start script to utilize the ssl cert+key.
Make a dir to store the .pem files in locally, and copy them over because we need to modify the permissions
mkdir ssl
sudo cp /etc/letsencrypt/live/lindabnotary.home.com/fullchain.pem ./ssl/fullchain.pem
sudo cp /etc/letsencrypt/live/lindabnotary.home.com/privkey.pem ./ssl/privkey.pem
These are wrong permissions for production, but must be able to execute as user other than root (prod perms: 0700 dir, 0600 each file, owned by root)
sudo chown -R root:root ./ssl
sudo chmod -R 755 ssl
sudo chmod 644 ssl/*.pem
# it’s possible you could change the owner and decrease the accessibility of the .pem files, have not tried. Play around with it and find out (chown -R user:user ./ssl, chmod -R 0700, chmod 0600 ./ssl/*.pem)
.pem files, have not tried. Play around with it and find out (chown -R user:user ./ssl, chmod -R 0700, chmod 0600 ./ssl/*.pem)Ignore that, I tried this:
avery @ wharfrat ~/node/lindabnotary
└─ ▶ sudo chmod 0653 ./ssl/.pem avery @ wharfrat ~/node/lindabnotary └─ ▶ sudo chmod -R 0754 ssl avery @ wharfrat ~/node/lindabnotary └─ ▶ sudo chmod 0653 ./ssl/.pem
avery @ wharfrat ~/node/lindabnotary
└─ ▶ npm start

> [email protected] start
> bash https-dev-script.sh

EACCES: permission denied, open '/home/avery/node/lindabnotary/ssl/fullchain.pem'
Just make the ssl dir owned root, perms readable all users – it works, this is not production.
You can embed all these variables into package.json, but I opted to make a separate script
filename: ~/projectfolder/https-dev-script.sh
#!/usr/bin/env bash

export HTTPS=true
export SSL_CRT_FILE=./ssl/fullchain.pem
export SSL_KEY_FILE=./ssl/privkey.pem

react-scripts start
Make the script runnable:
chmod +x ./https-dev-script.sh
and then modified package.json to run the script:
  "scripts": {
    "start": "bash https-dev-script.sh", # this is our mod
    "build": "HTTPS=true react-scripts build",  # not sure if HTTPS=true does anything during build - look into
    "test": "react-scripts test", # FYI you cannot put comments in json files
    "eject": "react-scripts eject"
  },