
I am testing certbot locally with Create-React-App, but I’m using WSL2. Little did I know, the networking for Ubuntu in WSL2 is a little strange when coming from your typical systemd-network, NetworkManager, ifupdown, <insert your favorite networking API>
Apparently, the networking is taken care of in the lxssManager service (you can reveal it / restart it, etc. in task manager – ctrl-shift-esc -> services). This is because WSL doesn’t have an init system, unless you get some kind of hack to give you a systemd-ish responsive system – I’ve heard of something called ‘genie’, but I haven’t wanted to try it, since I’m trying to do WSL the “right” way 😂
Anywho, if you want an IP from your WSL installation that’s in the same subnet as your LAN, you’re out of luck, since the IP address supplied to your WSL instance is provided through NAT. Some threads I was scanning while looking for a solution talked about installing Hyper-V Virtual Network Manager, but wanting to keep things as light as possible, I have no interest in installing Hyper-V or any of its tools just to get a bridge network setup for WSL.
So I poked around the Network Connections in the Control Panel – this can be revealed by searching for Control in the start menu (it’s been getting progressively more hidden every release since the introduction of the UWP “Settings” app). Once you’re in there, go to Control Panel\Network and Internet\Network Connections (you can paste that line straight in the address bar) and look at what you’ve got. You should see something like this:

Although it’s likely you won’t have a “Network Bridge”… yet.
Here’s what to do:
Highlight your Ethernet (or WIFI) connection (or both) and the “vEthernet (WSL)” adapter (can select multiple by holding down CTRL while clicking on them), then right-click and select “Create Bridge” from the menu.
That’ll take a minute, but should leave you with this thing:
One of the threads I read said you have to restart after creating this thing, but that was not my experience. If you’re having weird networking issues you can’t figure out, you might want to give that a shot.
Then once you have it bridging your WSL adapter with your choice of wired-NIC or WIFI, head over to your bash prompt and set the adapter – note, my LAN’s subnet is 192.168.1.0/24, you’ll want to adjust that for whatever yours is:
 sudo ip addr flush dev eth0
 sudo ip addr add 192.168.1.244/24 dev eth0
 ip addr show dev eth0
 sudo ip link set eth0 up
 sudo ip route add default via 192.168.1.1 dev eth0
 ip route show
 ping 192.168.1.1
 ping google.com
So I’ll run through these real quick:
First you flush your old NAT ip settings, then you assign an address to your WSL adapter. I just picked one at random, but I’d definitely recommend checking to make sure you don’t have the IP address assigned first (try an IP scanner, like arp-scan, or something in Windows – note: I always get horribly paltry results with arp -a for some reason).
Give your WSL eth0 adapter the IP in CIDR notation, then set it to up so you can create a route for it. Create the route to your local gateway (e.g. 192.168.1.1 or whatever yours is…)
Show that your address has been created, the default route has been created, then I like to ping a local machine like my gateway, then something that requires name resolution (here I used google).
Funny thing is, that actually worked before setting up the DNS resolver file, but you have to do that next. I don’t think it was pinging using ipv6, so that doesn’t explain why it worked – probably some weird Windows networking dichotomy, but sure enough, nothing else will really work in name resolution land beyond that, so it’s time to do the next step…
You’ll want to move the /etc/resolv.conf file to /etc/wsl.conf (unless you already have a wsl.conf file, of course – but it’s not created by default). I just invoked # mv /etc/resolv.conf /etc/wsl.conf since it already had the lines I had to add to wsl.conf in it, and I was about to replace it anyway…
Make your /etc/wsl.conf file look like this:
└─ ▶ cat /etc/wsl.conf
# This file was automatically generated by WSL. To stop automatic generation of this file, add the following entry to /etc/wsl.conf:
[network]
generateResolvConf = false
Then create an /etc/resolv.conf file using your favorite DNS servers (1.1.1.1, 1.0.0.1, 8.8.8.8, etc.) I have local DNS, so here’s mine:
# echo 'nameserver 192.168.1.2
> nameserver 192.168.1.3
> search webtool.space' > /etc/resolv.conf
Run something like # apt update to make sure stuff’s resolving now. In my case it was all good.
Note: These ip commands are ephemeral, so you’ll probably want to do some research into how to making them more permenant. I literally put that first block of ip commands in a script to run for when I come back after a restart, because I’m almost 100% certain all this setup will be lost.
One really interesting caveat is that I noticed the Network Bridge in the Control Panel didn’t include the “vEthernet WSL” adapter when I restarted. The bridge was still there, but only had my Ethernet adapter in it, so I had to manually add the WSL adapter again manually in properties.
There’s apparently two config files – one’s the /etc/wsl.conf file we just created, the other is C:\Users\YourUserName\.wslconfig
Unfortunately, the /etc/wsl.conf file is pretty limited as to network config – I did add the generateHosts = false line in mine, because my /etc/hosts had a bunch of weird Windows-only subdomains created by programs that are totally unnecessary to have in Linux, but there’s a lot of other neat stuff in there related to selective case sensitivity, mounting different filesystems, etc. you might want to check out.
So I’m still searching for ways to make this permanent, but once I figure it out, I’ll come back and finish this post. Might have to send an issue to the devs over on GitHub, but I’ll get this working eventually. For now, adding WSL back in the bridge if I restart and running my script isn’t that big of a deal.
Update: This post is a small part of a comprehensive project I was working on. So far, I have posted my raw notes for others to scour if they want to try and re-create the environment: https://develmonk.com/2021/06/05/raw-notes-from-creating-a-local-dev-and-build-https-server-for-create-react-app-using-nginx-and-certbot/
30 responses to “Easiest WSL2 Bridge Network (without Hyper-V Virtual Network Manager)”
Thanks averyfreeman for this great tutorial which worked out perfectly for me on Windows 10.
I just wanted to add, that this is not the case for Windows 11 anymore. There, in the control panel the virtual network adapters are not shown anymore, they are shown in the task manager and when doing ipconfig /all but not in the control panel. I don’t know if this is a bug (or a feature) and had to use the Hyper-V Manager on Windows 11 to bridge WSL to my physical network.
What I did not try is to bridge the network adapters using powershell…
I can’t see vEthernet(WSL) inside menu Control Panel\Network and Internet\Network Connections.
How to show it?
I had to look this up, honestly, because I didn’t have it either and wasn’t sure why. Apparently it’s part of the Sandbox feature (?). Here’s how I got it installed:
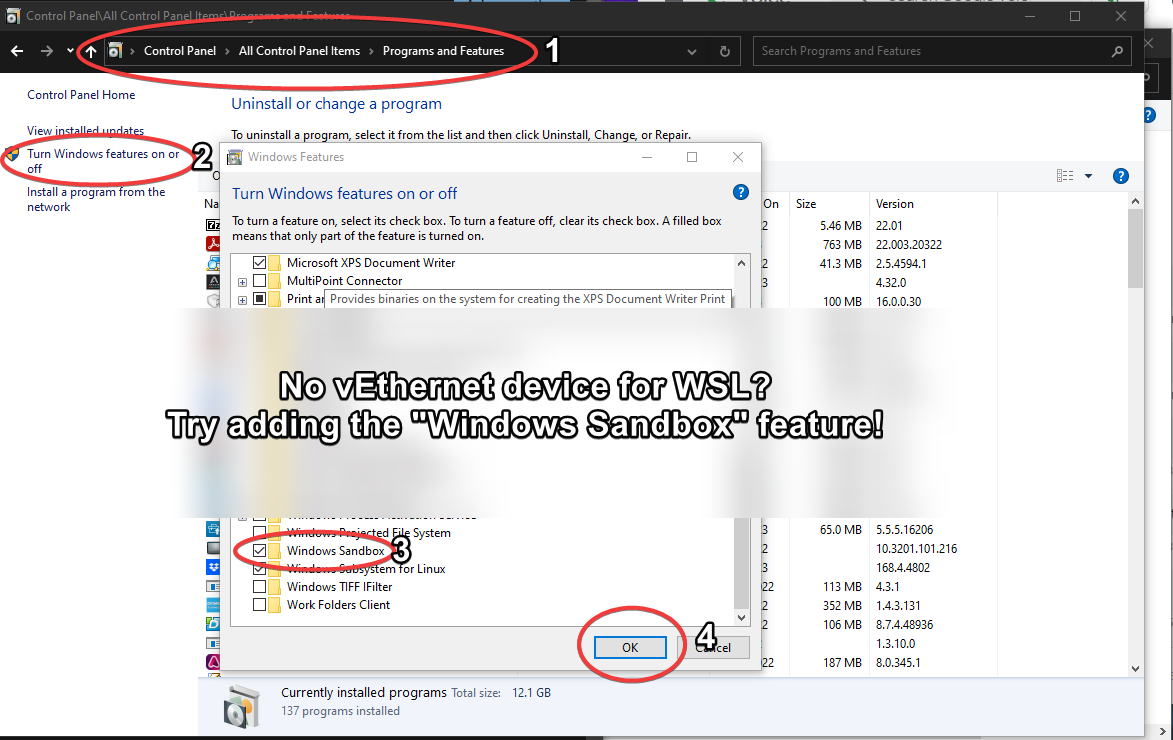
Hey, bro, I have already been abled Sandbox feature, but still no vEthenet.
Perhaps you are running a Windows edition pre-2004? See: https://learn.microsoft.com/en-us/answers/questions/56669/windows-sandbox-creates-a-vethernet-for-every-phys
I stumbled into this, and this was great! Solved one problem, created another. I am unable to access my WSL2 windows host machine via IP this way. Any thoughts on that?
Try giving them different IP addresses! 😂
This. This is exactly what I needed. So much more intuitive and honestly more robust than the other solutions to this nightmare of a design flaw. Everything works perfectly as it should, thank you so much for this!!
Absolutely, and thanks for the thanks! 😂 I’m very glad it helped you out.
How did you resolve the issue that as soon as you bridge the WSL vEthernet adapter to the actual ethernet adapter in windows, windows seems to no longer know how to reach the internet? I had to remove the two adapters from the bridge to get internet working again on the WSL host pc.
Make sure “ethernet” is the one that “wsl” is bridged to, not the other way around, for starters. Then, if you still don’t have connectivity, check and see that your
/etc/wsl.confa file has sane network defaults, like this:[network]hostname = wsl-pawn-sacrifice
generateHosts = false
generateResolvConf = false
More on wsl.conf here: https://learn.microsoft.com/en-us/windows/wsl/wsl-config#example-wslconf-file
Make sure you have
/etc/resolv.conffile and set it to your DNS of choice, like inside is a line that says:nameserver 8.8.8.8
That ought to do it, but you can also check
/etc/hostsand give it the names of some things you want it to be able to reach with local DNS resolution, like:127.0.0.1 localhost localhost.localdomain10.0.0.1 gateway gateway.localdomain
and so on… Good luck!
Thank you, that was exactly what I was looking for <3
Also an easy way that still works since windows NT4:
– open ‘windows run’ (shortcut: Win +r)
– type ‘ncpa.cpl’ en press
As an added bonus the run box remembers your command, so next time you can just look it up.
There is many more control options you can open directly: diskmgmt.msc, taskmgr, services.msc and so on
I don’t have windows sandbox feature
This may be dependent on version, what edition are you running. Are you saying you have the sandbox feature turned off, but you have vEthernet?
hi, thanks so much for your tutorial, it helps me a lot!
maybe do you have a final solution for this?:
AFAIK you have to re-add WSL NIC in control panel every time you reboot (through the right-click -> properties menu) – trying to work around this, but haven’t found a solution yet as of 8am 6-5-202
thanks in advance
Yes, I did notice having to do this when I ran this configuration. I am mostly running Arch Linux bare metal instead of WSL these days, so I apologize for not having found a solution. Best regards!
First thank you soo much as this article was extremely helpful. Alter `.wslconfig` is only possible under windows 11. To this day, it is not work as it should under Windows 10. Which drive me to search for another method and I got across yours.
Because I had few fringe issue such as speed and WSL launch time when config `/etc/wsl.conf`, I wrote this script which might be useful instead of manually config the `nameserver` manually.
In `~/.bashrc`:
“`
# Check if the flag file exists
if [ ! -f /tmp/my_command_executed ]; then
# Run your command
~/./renetwork.sh
# Create the flag file in /tmp to indicate that the command has been executed
touch /tmp/my_command_executed
fi
“`
In `renetwork.sh`:
“`
#!/bin/bash
sudo sed -i ‘/nameserver/ s/\(nameserver \)[0-9.]\+/\1192.168.1.1/’ /etc/resolv.conf
sudo ip addr flush dev eth0
sudo ip addr add 192.168.1.244/24 dev eth0
ip addr show dev eth0
sudo ip link set eth0 up
sudo ip route add default via 192.168.1.1 dev eth0
ip route show
ping -c 3 192.168.1.1
“`
# edit (moderator): 20231218 – changed “lunch time” to “launch time”. Great submission, thank you!
This is exactly what I wanted for my sshuttle .
adding this route in Windows,
route add 0.0.0.0 mask 0.0.0.0 192.168.1.244
will route all traffic via WSL–Shuttle from Windows.
Thanks for this info! Very very helpful and much simpler than other solutions. I have a script running in WSL to configure the IP address after reboots, however I noticed that the network bridge also does not persist across boots. Is there anyway to have the network bridge to vEthernet (WSL) persist?
Sorry, I haven’t used WSL extensively in quite some time, as I’ve moved to an Arch Linux daily driver. I do seem to remember having to re-create the bridge on each login, though. If you could scope the powershell commands to do it, you could create a script and run it on login. I’d love to see what you come up with if you work it out!
Thanks for this article, it was helpful in solving my issue with the obnoxiously rigid network settings of WSL.
I haven’t been able to make the changes permanent either, so I wrote a Powershell script which does it for me.
There is a really strange behaviour where if I try to set the WSL VMSwitch mode to External (for bridging), it throws an ‘Access is Denied’ error at me.
But if I first change the VMSwitch to Private (which also gives the error, but still makes the change for some reason) and *then* change to external, it works. Why this is, is beyond me. Maybe because WSL was never meant to have a bridged network? *shrugs*
Also, if my PC goes to sleep, when it wakes back up (after I’ve successfully bridged WSL to my LAN), the WSL machine grabs the *same* IP as my host machine on the bridged adapter, which leads to .. funky networking behaviour. Not sure why.
Anyway, I spent way too long writing this script, and it’s probably broken as hell if someone else tries to run it, lol.
But I’ll share it if anyone comes across this article and comment and is interested in automating the procedure instead of tediously clicking the mouse around for every startup.
Basically, it removes all network bridge bindings (assuming you only have that one WSL-bridge), sets the WSL VMSwitch to Private, then creates a bridge to the WiFi adapter (can be changed to whatever adapter).
Then the ‘sudo dhclient -v’ command is passed to the Ubuntu/Kali WSL machine (with a plaintext sudo password in the .ps1 script – NOT for production use).
Lastly the new DHCP IP of the WSL machine is displayed.
Thanks for sharing, Turd. I hope it keeps working for you! I never did get the bridge members to persist, I’d have to re-add my Ethernet and WSL network devices to the network bridge in control panel after every time I rebooted. It probably makes more sense to use the Hyper-V Tools _Windows Feature_, which when I wrote this was in Control panel -> Programs -> Add Windows Features -> Hyper-V –> Management Tools,
but now is under the UWP Settings program as an “Optional Feature”, and I am not exactly sure how which one to install because I don’t use Windows at all anymore, but I still want to help, so I wanted to show you I found some really elaborate learning materials that, if dissected, I am almost certain would provide a similar solution to my point-and-click WSL2 bridge using powershell scripts, and it seems like they’d be more likely to persist, too (if nothing else, you could set a script to run on startup or login for a script more easily): https://github.com/Azure/LabServices/tree/main/ClassTypes/PowerShell/HyperV
I also incidentally built openvswitch along with the Linux packages the other day, it’s not compiled, but if you want to check it out it’s over at https://github.com/averyfreeman/ovs-windows-installer
This is not a design flaw in Windows 11 but intended to make WSL2 less prone to security issues. I would suggest the following alternative if you need access to WSL2 from your LAN or even WAN:
1. Establish an autossh connection from your Windows 11 host (WSL2) to a server or machine in your LAN
2. Start SSH and autossh on user logon from Windows with the following commands:
C:\Users\\AppData\Local\Microsoft\WindowsApps\bash.exe -c “sudo /etc/init.d/ssh start”
C:\Users\\AppData\Local\Microsoft\WindowsApps\bash.exe -c “autossh -M 0 -f -N -R :localhost: host.domain.tld -p && sleep 1”
(note: sleep 1 second is required to give autossh time to drop into background before the shell is terminated)
3. Allow /etc/init.d/ssh to be started as root by your Windows login user in WSL (visudo)
4. Add the following options in the server’s sshd_config to have ssh drop the connection if unresponsive:
ClientAliveInterval 60
ClientAliveCountMax 10
With this you can access your WSL2 instance anytime from anywhere. You will need to open the in your firewall if you need WAN access, and you should consider restricting the task in Task Scheduler to run on “AC power” only to preserve battery.
This is a different solution intended for a separate purpose tangentially related to the article. If it keeps the bridge members active, it is an artifact. Nonetheless, I appreciate you mentioning it and will definitely publish your comment. Having the members WSL vnic + Ethernet (or wlan, etc.) survive a reboot is probably the question I am asked most frequently, and since I never personally came up with a solution (other than re-adding the members after each reboot), I imagine people will be really happy to try yours. An aside: The article was written before W11 was released, I was running W10 LTSC 1809 IIRC.
Simply put, thanks for the inspiration – The ultimate recipe
https://github.com/Unsigned-Char/WSL2HyperVSwitch
Hey, nice work, I’m really glad to see it, and I hope it helps some visitors – thanks for sharing!
Edit: I like how your instructions comprehensively go through host and VM networking, especially implementing some newer WSL features like `wsl.conf`, which apparently now let’s WSL mock `systemd`-init system, which is totally huge. I remember setting up a *cough cough* “ms cron” once by wiring up `Windows Task Scheduler`, since that’s all we had at the time. VM network behavior looks a lot more predictable with `systemd-networkd` set up, instead of the weird interplay that used to happen due to MS-configured network adapters basically directly interfacing with the WSL VM, and also the reasonably minimal host setup using the `Windows Feature` requirements, `Microsoft-Hyper-V` and `Microsoft-Hyper-V-Management-PowerShell`. It looks right-sized and well thought-out.
Curious, since it’s been almost 5 years since I’ve tried this setup, if you install:
`Microsoft-Hyper-V`, and
`Microsoft-Hyper-V-Management-PowerShell`.
1) Does installing `Microsoft-Hyper-V` feature install the whole Hyper-V GUI, or only the engine and the scripts?
2) Does Windows require you installing `Microsoft-Hyper-V` in order to install `Microsoft-Hyper-V-Management-PowerShell`?
3) Have you looked into any 3rd party libraries that might be lighter / more targeted, through `NuGet/NuPkg/Chocolatey/Scoop`, etc.?
4) Do you want to try packaging this Windows version of Openvswitch I incidentally (read: accidentally) built the other day? 😂 I don’t really have an MS environment in which to build it myself, but still super curious about it because I didn’t even realize there could be Openvswitch on Windows🤯 : https://github.com/averyfreeman/ovs-windows-installer
Thanks again for sharing your setup instructions, really appreciate it
Hey how do you persist the ip settings?
If you mean the network settings in Windows, it never survived a reboot for me. IIRC I’d have to go back in and add the NIC I was using + WSL to the bridge in the Network Connections control panel. If you find a way – (off the top of my head, a powershell script that re-configures the bridge in a startup job would be inelegant, but probably work) – please report back and I’ll add it to the piece. Ironically, this is one of my most popular posts, and I haven’t used Windows for years – mainly due to stuff like this post was supposed to fix. Now that the lines between Linux and Windows have been blurred so much, it exposes Windows as an overly complicated hack job. If you want to join us, visit here: https://wiki.archlinux.org/title/installation_guide
I know you don’t really use this anymore, but on my end I have added `command = “ip a flush dev eth0; ip a add 192.168.1.x/24 dev eth0; ip l set eth0 up; ip r add default via 192.168.1.1 dev eth0″` to my /etc/wsl.conf’s `[boot]` block to configure the networking on launch. I assume I’ll still need to re-add the vEth to the bridge; though, I don’t reboot that often 😀 I’m on Windows 10 22H2.
The post is very much appreciated!